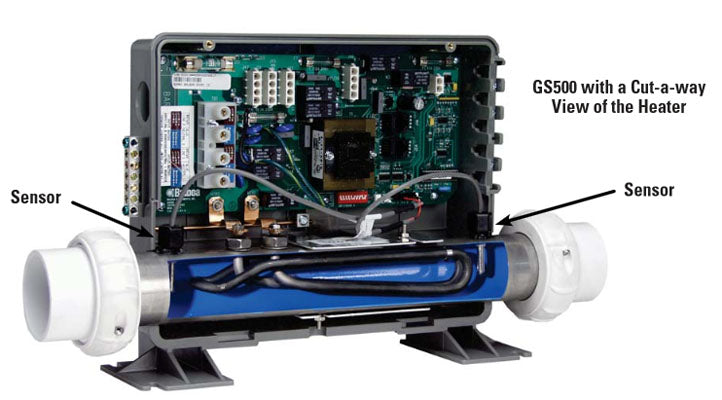
How to Replace a Hot Tub Spa Heater
A failed spa heater can leave you with normal circulation but water that will not heat. Once the heater has been correctly diagnosed and the proper replacement has been identified, many common electric flow-through heaters can be replaced without replacing the entire spa control system.
This guide walks through the general replacement process in seven steps and explains what to check before, during, and after installation.
Confirm the Heater Failed
Low flow, dirty filters, sensors, relays, wiring, and control-board problems can all prevent a good heater from operating.
Identify the Exact Replacement
Match the original part number plus voltage, kW, plumbing, length, sensors, mounting, and connection style.
Fill & Establish Flow
Never energize an empty heater. The tube must be full of water and normal circulation established first.
Before You Replace the Heater
A spa that is not heating does not automatically have a bad heating element. Confirm the actual cause before purchasing or installing a replacement.
Problems That Can Prevent Heating
- Dirty or restricted filter
- Low water level or trapped air
- Weak or failed circulation pump
- Closed or partially closed valves
- Temperature or high-limit sensor problems
- Pressure-switch or flow-switch problems
- Heater relay or circuit-board failure
- Incorrect control-system configuration
Confirm These Heater Details
- Manufacturer and original part number
- Voltage
- Kilowatt rating
- Heater length
- Plumbing / union size
- Sensor or pressure-switch arrangement
- Electrical connection style
- Mounting configuration
Dry Firing Is a Common Cause of Heater Failure
A dry fire occurs when the heating element energizes without enough water surrounding or flowing through it. Because the heat cannot transfer into the water, the element can overheat and fail very quickly. If the original heater failed because of low flow or an air lock, correct that condition before installing another heater.
Tools & Preparation
Commonly Needed
- Screwdrivers
- Appropriate wrenches or large pliers
- Wire labels or masking tape
- Phone or camera
- Towels or shallow container
- Correct replacement heater
- New union gaskets or O-rings when required
Take Photos First
Before disconnecting anything, photograph the complete heater, electrical connections, sensors, heater plugs, grounding or bonding connection, control-system terminals, and plumbing. Those photos can be extremely helpful during reassembly.
Seven Steps to Replace an Electric Spa Heater
Turn Off Power and Isolate the Water
Turn off electrical power to the hot tub at the breaker or disconnect. Do not rely on the topside control panel to make the equipment electrically safe.
If the spa has working shut-off valves on both sides of the heater, close them. If the heater cannot be positively isolated, lower the water sufficiently or drain the spa before opening the plumbing.
Do Not Proceed Until Power Is Off
When appropriate, verify that electrical power is actually absent with proper test equipment before touching electrical connections.
Drain or Lower the Spa Water
Use the spa's normal drain fitting or draining procedure to remove enough water to safely open the heater plumbing.
If properly functioning isolation valves completely separate the heater from the spa, a full drain may not be necessary. If there is any doubt that the valves will hold, draining the spa is more predictable.
Even after draining, expect residual water to remain inside the heater tube and nearby plumbing.
Disconnect the Heater Electrical Connections
After the water has been isolated or drained and power is confirmed off, locate the heater electrical connections.
Depending on the control system, the heater may use a plug-style connector, direct terminal connections, copper or metal straps, or another manufacturer-specific connection.
Photograph and label every connection before disconnecting it.
Remove the Old Spa Heater
Place towels or a shallow container below the heater to catch remaining water.
Loosen the large union nuts on both sides of the heater. Try by hand first. If a tool is required, use it carefully to avoid cracking or distorting the plastic union nuts or connected PVC plumbing.
Remove any mounting hardware, sensor connections, pressure-switch connections, and grounding or bonding connections required by the heater, then remove the assembly.
Inspect the Seals and Install the New Heater
Before fitting the replacement, inspect the heater union gaskets or O-rings. Replace seals that are cracked, flattened, hardened, torn, distorted, or missing.
Compare the new heater to the original one more time. Verify part number or confirmed replacement, voltage, kW, plumbing size, overall length, sensors, electrical connection, and mounting.
Clean the sealing surfaces, seat the gaskets correctly, position the new heater, and start the union nuts by hand. They should thread smoothly.
Reconnect the Heater, Sensors and Grounding
Reconnect the replacement heater using the photos and labels made before disassembly.
Depending on the system, this may include heater power, temperature sensors, high-limit sensors, pressure or flow switch, grounding or bonding connections, and other heater-specific wiring.
Make sure every connector is fully seated and route wiring away from sharp edges, hot surfaces, and moving components. Reinstall and secure the control-box cover before restoring power.
Refill, Prime, Check for Leaks and Restore Power
This is one of the most important steps in the entire repair.
- Close the spa drain.
- Open any shut-off valves that were closed.
- Refill to the manufacturer's normal operating level.
- Inspect both heater unions and fittings for leaks.
- Prime the circulation or jet pump as required.
- Remove trapped air from the plumbing.
- Make sure the heater tube is completely full of water.
- Confirm the circulation system is ready to establish normal flow.
Only after the spa is properly filled and ready to circulate water should electrical power be restored.
Prevent a Dry Fire
Never restore power to an empty heater just to see whether it works. The heater must be full of water and adequate circulation must be established before the element is allowed to energize.
After the Spa Is Running Again
Do not close the equipment compartment immediately and walk away. Watch the spa through the first heating cycle.
Confirm Normal Operation
- Normal circulation is established
- No leaks are visible at heater unions
- No leaks are visible around sensors or fittings
- No flow, sensor, or heater error appears
- The spa begins heating when there is a heat call
Stop and Investigate If You Notice
- Water leaking into the control box
- Electrical burning smell
- Arcing or sparking
- Unusual buzzing or overheating
- Repeated dry, flow, or high-limit codes
- Heater remaining energized when it should not be
What If the New Heater Still Does Not Heat?
| Symptom | Possible Cause | What to Check |
|---|---|---|
| Normal circulation, no heat | No heater voltage, failed relay, control issue, incorrect configuration | Confirm the control is calling for heat and that the heater is being supplied correctly. |
| Flow / dry error | Dirty filter, air lock, weak pump, closed valve, restricted plumbing | Correct the circulation problem before continuing to reset the spa. |
| Sensor error | Sensor wiring, connector, incorrect sensor, damaged sensor | Inspect sensor connections and compare the replacement configuration to the original. |
| Breaker trips | Ground fault, damaged wiring, heater fault, incorrect connection | Disconnect power and have the electrical fault diagnosed before further operation. |
| Heater unions leak | Damaged gasket, misaligned plumbing, cross-threaded nut, damaged fitting | Shut the system down, relieve pressure, and correct the sealing or alignment problem. |
| Water heats very slowly | Normal heat-up time, low kW heater, heat loss, voltage issue, cover problem | Verify heater rating, actual power, cover condition, ambient temperature, and spa volume. |
Why Did the Original Heater Fail?
Flow & Water Problems
- Dry firing
- Low water level
- Air lock
- Dirty filter
- Closed valve
- Weak circulation pump
- Scale buildup
Electrical & Age-Related Problems
- Loose or overheated connections
- Failed heater relay
- Control-board problems
- Corrosion
- Water chemistry damage
- Normal age and repeated heat cycles
Fix the Cause Before Replacing the Part
If the original heater failed prematurely, determine why before installing the replacement. Otherwise the same low-flow, scale, electrical, or control problem may damage the new heater as well.
Need to Identify the Correct Replacement Heater?
The original heater part number is the best starting point. If that number is discontinued, the Heater Finder can help identify the current replacement path when one is available.
Related Heater & Troubleshooting Resources
Electrical & Installation Disclaimer
This page provides general information for replacing common electric flow-through spa heaters. Heater installations, wiring, sensors, control systems, bonding requirements, and plumbing vary by manufacturer and model. Always follow the instructions supplied with the heater and spa control system. Electrical work may require a qualified or licensed professional.
Replacement procedures vary by spa manufacturer and control-system design. The illustrations on this page are general visual aids and are not wiring diagrams for a specific spa.